
Invitations can be sent from FundEasy to people from a list of email addresses from your own database, a list created in FundEasy, or to registrants from a previous event.
Invitation Limits:
- Admins do not have a limit of how many invitations they can send at a time.
- Hosts have a limit of 50 emails at a time
- Those using the Public Invitation page (the invite link on your templates) have a limit of 20 emails at a time.
Email Invitation List
You can create an invitation list with first name, last name, email address, phone, and mailing address within your event. This list can be exported after your event, and it can be imported into future events. First name, last name, and email address is required.
- Choose Email Invitations
from the Event Tools Menu on the left.
- Select Email Invitation List from the lefthand menu options.
- Click Add to List in the upper right corner.
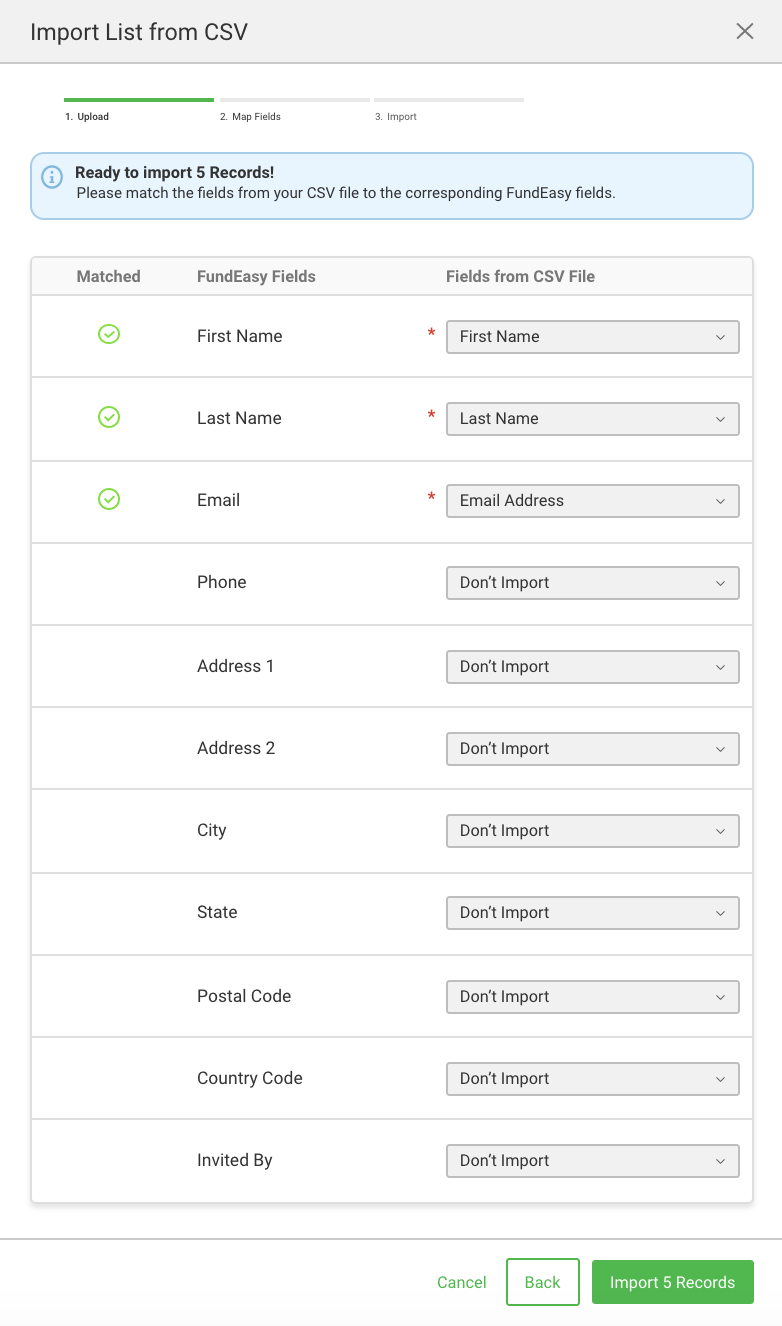
- Click Import CSV
- Drag and drop a CSV file into the popup modal or click the Choose File button to choose a CSV file from your computer.
- Map the fields in your file with the fields in FundEasy.
- Click Import. This will upload your CSV list to the Invitation List.
Note: Any duplicate records or records with invalid or missing email addresses will not be uploaded.
CSV facts and troubleshooting
- CSV stands for Comma Separated Values. It is a file type that is available when you save a file. Most software offer options to export to CSV. FundEasy exports to CSV by default.
- If you are changing an Excel file (ending in .xlsx or .xls) into a CSV file, be sure to do a "Save As..." from the File menu and save it as a "Comma Separated Values (CSV) File." Changing the file name alone is not the same as changing the file extension with "Save As...".
- You can import email addresses only from a CSV file. Follow these links for instructions to create a CSV file from Hotmail, Yahoo, and Gmail contacts. Click here for instructions from about.com on exporting your Outlook Contacts to CSV.
- At minimum, your CSV file needs to have separate column headings for First Name, Last Name and Email Address in order to import. However, the First Name and Last Name columns do not need to have data in them. The only required data for the import is the email address.
- If the file isn't importing or certain entries aren't importing, check to make sure there aren't spaces after the emails in the spreadsheet or that there aren't multiple emails in one cell.
Adding Individuals to the Email Invitation List
- Choose Email Invitations
from the Event Tools Menu on the left.
- Select Email Invitation List from the lefthand menu options.
- Click Add to List in the upper right corner.
- Choose Add Person and complete the form. First Name, Last Name, and Email Address are required. The other fields are optional.
- Click Add to save this name to the Email Invitation List
Importing Email Invitation Lists from past events
- If you have not used the Email Invitation List in the past, there will not be a list to import. You cannot import from Sent Invitations from previous events.
- In your current event, from Email Invitations > Email Invitation List > Add to List, choose Import from Another Event
- Choose the event that contains your Email Invitation List.
- If you'd like to import your past registrants into the Email Invitation List, you can export the Attending Registrants Report and then import that list.
- You can also go to Manage Registrants > All Groups and click the View as Report link in the right corner. From that link click Export. Use Change Columns to add or hide other fields from the report.
Sending Invitations from the Invitation List
- Click the box in the Full Name header to select all, or find the name(s) in the Invitation list and click the box next to the name. This will select these people to be invited.
- Click Send New Invitation.
- On the next screen you can write a note encouraging the invitees to come.
- See what the email will look like by clicking "Preview Email." Your invitations are ready right out of the box, but you can make changes to the invitation template by clicking Customize Email Template in Send New Invitation or from Event Tools > Event Setup > Web & Email Templates.
- Check "Email me when guests register" if you would like to be notified when any of these people register.
- Click Send Invitations.
Resending Invitations from the Invitation List
- Click the box at the top of the Full Name column to select all the email address. Email addresses for guests that are marked in the Has Registered will not be used, even if they are checked off in the list.
- To email only a segment of the Invitation list, you'll need to check them off individually.
- Once you have selected the names, click Send Invitation to open the composer to add a personalized note.
- Preview your email, and when you're satisfied with how it looks, click Send Invitation Email.

Peer-to-Peer/Attendance Training Video: Email Invitations
Read video transcript here!